Keep Talking and Nobody Explodes Manual Easy

Keep Talking and Nobody Explodes
This item has been removed from the community because it violates Steam Community & Content Guidelines. It is only visible to you. If you believe your item has been removed by mistake, please contact Steam Support.
This item is incompatible with Keep Talking and Nobody Explodes. Please see the instructions page for reasons why this item might not work within Keep Talking and Nobody Explodes.
Current visibility: Hidden
This item will only be visible to you, admins, and anyone marked as a creator.
Current visibility: Friends-only
This item will only be visible in searches to you, your friends, and admins.

284 ratings
Shortened Version of Manual for Experienced players
This guide aims to be a short and faster version of the manual, shortening some formules and giving easier methods for most modules, but is slightly hard to understand if you have never played before. It contains some tips, some of my methods and various other methods from other guides.
If you wish for anything to be modified, see an error or anything similar, please comment and I will answer in the shortest amount of time possible.
Please note that the guide is still kinda WIP, and it does contain some errors. I'm trying to fix them, but if you find an error be sure to tell me, it helps a lot!
Abreviations and explanations
This section contains explanations on certain things, and abreviations used
Batts = Batteries
SN = Serial Number
Wires
3 wires:
1: No reds - Second wire
2: 2+ blues and last wire isn't white - Last blue wire
If all of the above fails - Last wire
4 wires
1: 2+ Reds and SN finishes odd - Last red wire
2: No reds & last wire yellow - First wire
3: 1 blue - First wire
4: 2+ Yellows - Last wire
If all of the above fails - Second wire
5 wires
1: Last wire is black and SN finishes odd - Fourth wire
2: No blacks or reds - Second wire
If all of the above fails - First wire
6 wires
No yellow and SN finishes odd - Third wire
1 Yellow and 2+ Whites - Fourth wire
No reds - Last wire
If all of the above fails - Fourth wire
Buttons
Follow these steps, and if none works, just hold.
1: Blue and says Abort: Hold the button.
2: 2+ batts and written Detonate: Press and release
3: Button is white and has CAR lit: Hold the button
4: Button has 3+ batts and lit FRK: Press and release
5: Red and written Hold: Press and release
If those doesn't work, hold.
Blue: Release on 4
Yellow: Release on 5
Others: Release on 1
Keypads
Keypads are quite simple to do, but you can simplify it even more by spotting certain symbols that only have a single column for them
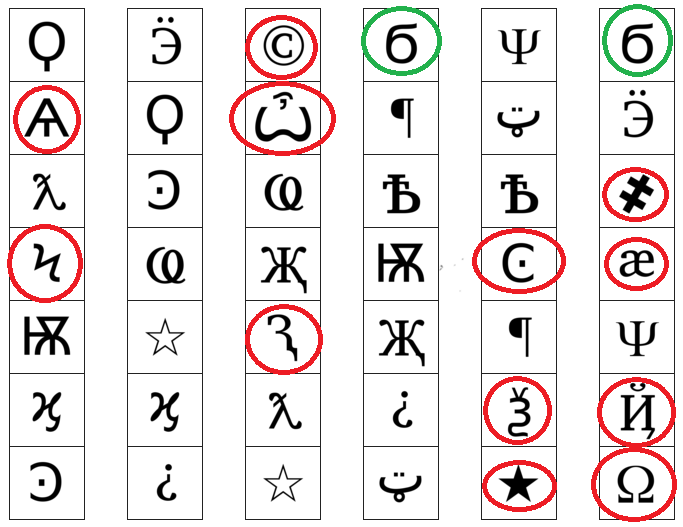
The symbols circled in RED are symbols that only appear in that specific column. If you see it, you can already tell which column you gotta pick.
The wierd 6s circled in green will ALWAYS be the first one you'll press if they appear, and only have 2 columns for them. I thought it could be important to note.
If you can remember both of these tips, it will make Symbols much faster, at least for the expert to select the correct column.
Simon Says (Credits to Cypher for picture)
I recommend doing this module first if it appears, so you don't have to worry about the amount of Strikes. That way, an experienced Defuser could solve the module on his own by only remembering two easy patterns. Here is a picture of the patterns: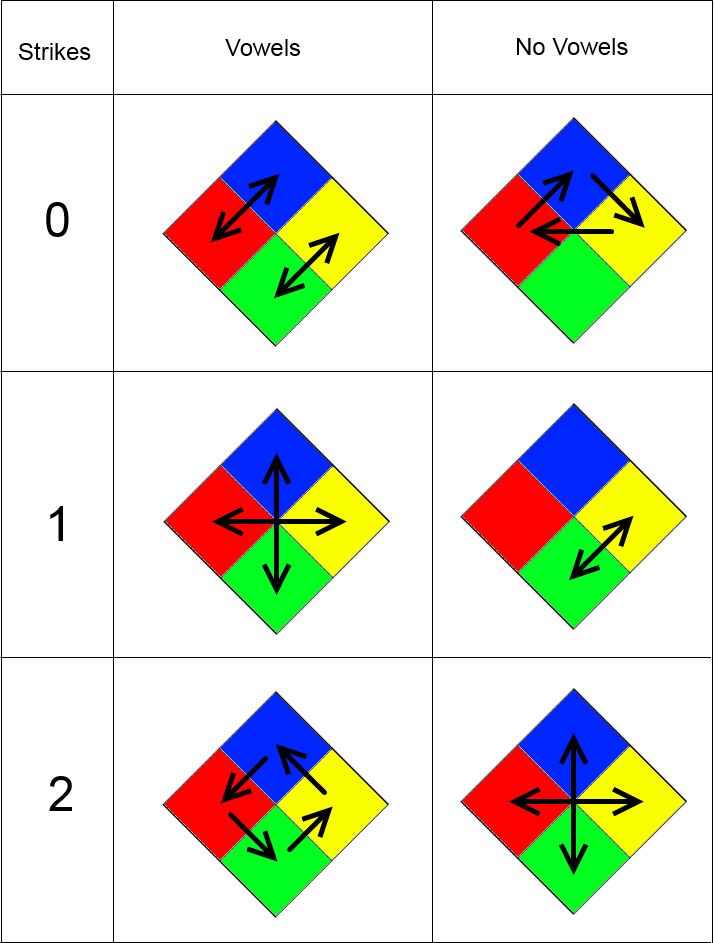
With a bit of practice, a defuser should be able to remember the patterns for Vowel and No Vowel 0 strike and defuse it first thing without any help, similar to The Button.
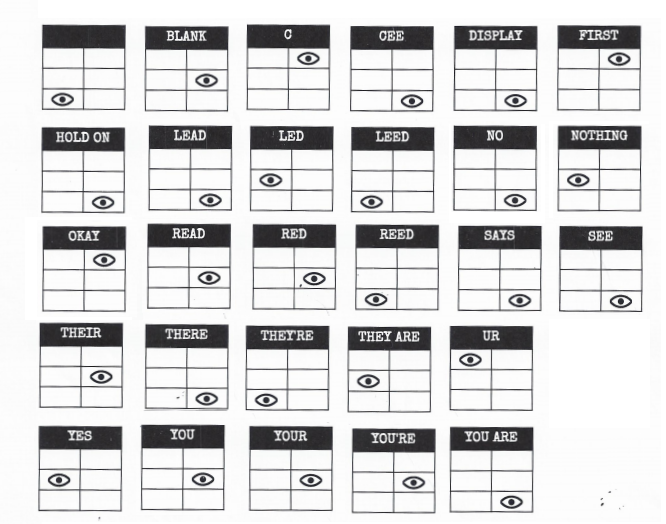
Who's on First (Credits to Cypher for pictures)
I don't have any tips to give here, it's simply a long and annoying module. Thanks a lot to Cypher for those pictures classes in order and without useless information

Memory
This list will shorten the sentences for faster reading. I will add some tips for it under the list.
Stage 1
1: Position 2
2: Position 2
3: Position 3
4: Position 4
Stage 2
1: Number 4
2: Same position as Stage 1
3: Position 1
4: Same position as Stage 1
Stage 3
1: Same number as Stage 2
2: Same number as Stage 1
3: Position 3
4: Number 4
Stage 4
1: Same position as Stage 1
2: Position 1
3: Same position as Stage 2
4: Same position as Stage 2
Stage 5
1: Same number as Stage 1
2: Same number as Stage 2
3: Same number as Stage 4
4: Same number as Stage 3
Things to remember:
Position of Stage 1 and Stage 2
Numbers of all stages (For stage 5)
For the first stage, an experienced Defuser should be able to easily do it on his own by remembering this: Display = Position you must press, except if the Display says 1 where it's position 2
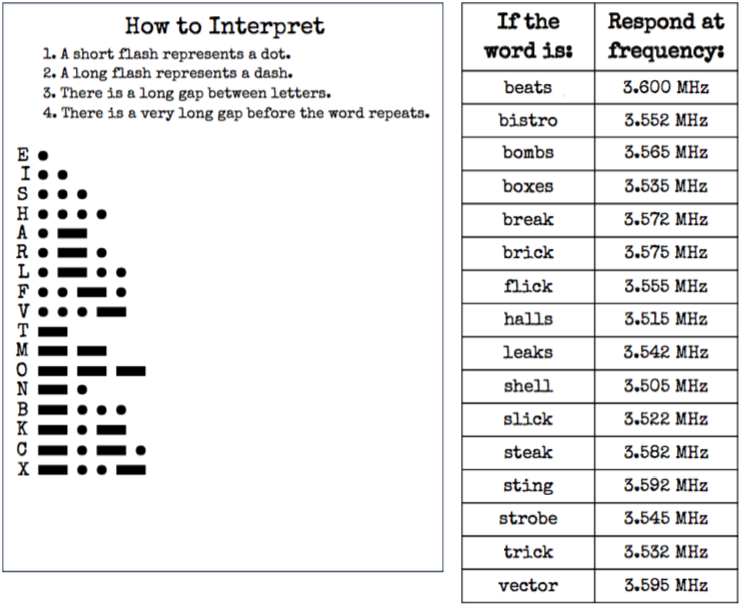
Morse Code
The Morse Code is something slightly complicated since it's very hard to get the letters in the good order. For exemple, you'll often be able to translate the first letter but the transmission will be on the third by then. And if that happens, you'd have to wait a looong time before the transmission resets, which is bad news. Because of that, it's hard to get a correct tip.. But here is the morse code without useless letters (Classed in dot/dash order) and the answers are classed in alphabetical order.
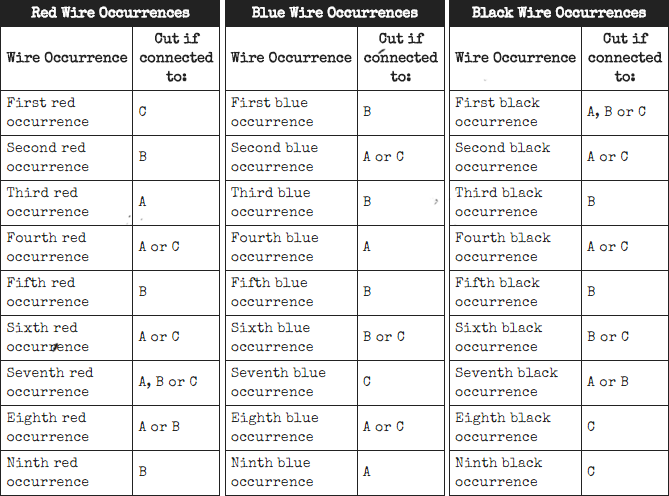
Complicated Wires
You can use the CTRL+F function to find easily results in this, but it may be a bit confusing
If the wire has the blue color, add B
If the wire has the red color, add R
If the wire has a star, add S
If the wire has a lit Led, add L
Exemple: Wire is blue, has star and LED. Your wire is "BSL"
The order of things is B, R, S, L. If you search for a Red wire with a Led on with "LR" and can't find it, that's because it's "RL", not "LR"
Wire is plain white: Cut
B - Cut if last number on SN is even
BR - Cut if last number on SN is even
BS - Do NOT Cut
BL - Cut if there is a Parallel Port
BRS - Cut if there is a Parallel Port
BRL - Cut if last number on SN is even
BSL - Cut if there is a Parallel Port
BRSL - Do NOT Cut
R - Cut if last number on SN is even
RS - Cut it
RL - Cut if there is 2+ batteries
RSL - Cut if there is 2+ batteries
S - Cut it
SL - Cut if there is 2+ batteries
L - Do NOT Cut
Wire Sequence
There is nothing really to modify about Wire Sequence's tables. What I can say though, is that using your fingers to keep track of which wire you're at as an expert is quite useful.
Maze
For spotting the correct maze faster, ask the defuser which Column has a circle in it and use this grid to find the correct maze faster.
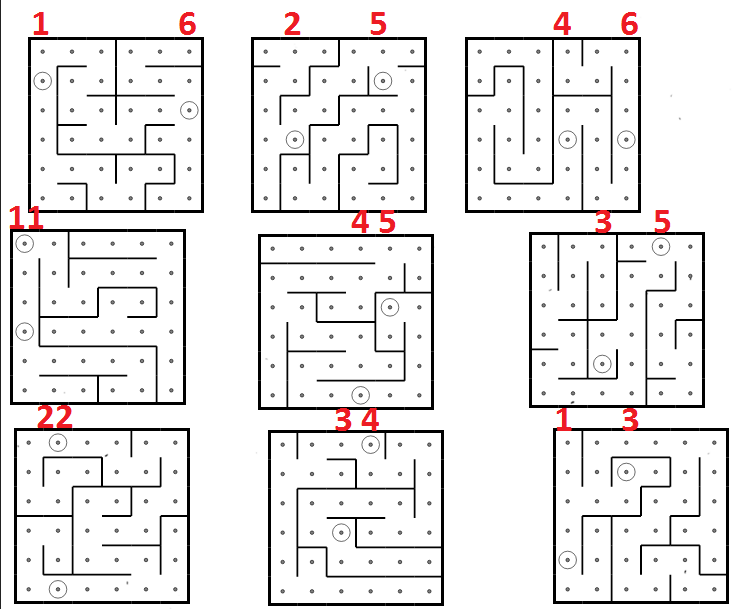
For exemple, if the defuser says "Column 2 and Column 5", that'd be the maze on the top middle.
I don't have much other tips for this, aside of using letters and numbers to give coordinates (Like B2, C5 or D1 for exemple) much similar to how Battleship works.
Password (Credits to Cypher for method)
This section uses a method Cypher used in a guide of his (Link in the Credits section) but with a picture I made myself that I think makes it simpler to use.
To use this picture, here is how it works:
First, the letter circled is the THIRD letter possibilities
Then, the letters under the circled ones are the FIFTH letter possibilities
Finally, under the Fifth letter is a list of words that could be the answer. If it's not it, find another combo of third and fifth letter and retry.

Venting Gas
Simple one.
If it says "Detonate?" - Press N
If it says "Vent Gas?" - Press Y
Capacitor Discharger
Just put the lever down whenever you can. No super trick or awesome tip here.
Knobs (Credits to Daido for the method)
This section is nearly word for word Daido's guide on Knobs.
Since naming all LEDs takes a long time, naming only LEDs that appears on both rows saves you time. Here's a list of the LEDs that appears on both rows

Quick identification for Experts:
UP: 3 - 6 or 3 - 5
DOWN: 2 - 3 - 6 or 0 (No double LEDs)
LEFT: 5
RIGHT: 1 - 3 - 5 or 1 - 3
![]()
![]()
You need to sign in or create an account to do that.
Source: https://steamcommunity.com/sharedfiles/filedetails/?id=573398462
0 Response to "Keep Talking and Nobody Explodes Manual Easy"
Postar um comentário